
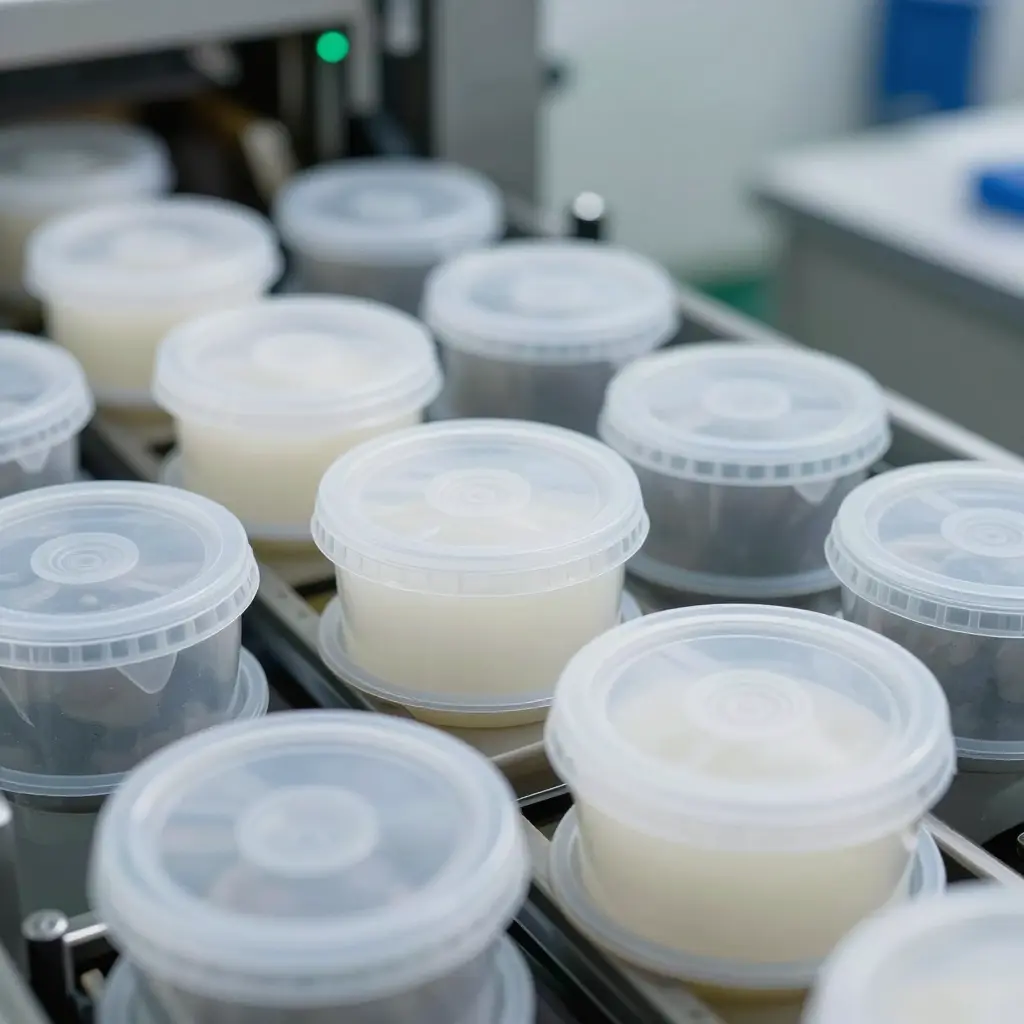
Why Round Plastic Food Containers Jam at the Rim on High-Speed Filling Lines
Round plastic food containers jam at the rim during automated denesting, and a jam stops the filling line. One stuck tub holds up the whole stack: the denester cannot peel a single container free, the filler starves, and throughput stays at zero until an operator clears the magazine by hand.
Most of these stoppages are not random molding defects or bad luck with a supplier. They come from a mismatch between rim geometry and taper, the two features that decide how nested tubs separate under load. Get them wrong and even a well-made container sticks; get them right and denesting runs clean at line speed.
A rim that is too broad, too flat, or too aggressively drafted will bind against the tub above it once stacking pressure and line vibration are added. The resulting jam looks intermittent, but it is predictable from the design. Knowing how rim profiles are formed during molding is the first step toward specifying a container that feeds reliably.
Why Nested Tubs Jam at the Rim: The Root-Cause Mechanics
When a stack of round containers stalls on a filling line, the stoppage almost always traces back to the rim. Once you know the mechanics, you can fix the cause instead of clearing jams all shift.
Contact Starts at the Rim Flange
Nested tubs touch only where their geometry meets: the rim flange and the upper wall. When two rims seat flange to flange, that contact ring carries the load, so friction concentrates on one narrow band instead of spreading across a surface.
Trapped Air Forms a Partial Vacuum
As one tub slides into another, the closing gap squeezes air out of the space between the walls. If the rim seats before that air escapes, the cavity seals and holds a partial vacuum. The lower tub then resists separation, and when it finally releases it pops, disturbing the stack.
Walls Flex Under Stack Weight
A tall stack presses down on the lower tubs. Thin walls deflect inward, the effective diameter shrinks, and the interference fit tightens on its own. Add heat from a hot fill or a warm plant floor and the plastic softens further, deepening the grip.
Small Diameter Variations Concentrate Friction
Molded parts carry tolerances of a few tenths of a millimeter. A rim at the high end of that range drives deeper into its neighbor, and because the contact is localized, the extra material concentrates friction at the rim flange instead of spreading it.
Taper Is the Variable You Can Control
The taper angle sets how deep nested tubs seat and how much of the rim contacts the tub below. Specifying the right draft, and confirming rim diameter tolerances during verification of the plastic food container manufacturing process, keeps jams from starting.
Where the Rim Meets the Rim: A Cross-Section View
When one round tub drops into another, two surfaces decide whether the stack separates cleanly on the filling line or seizes into a solid plug.
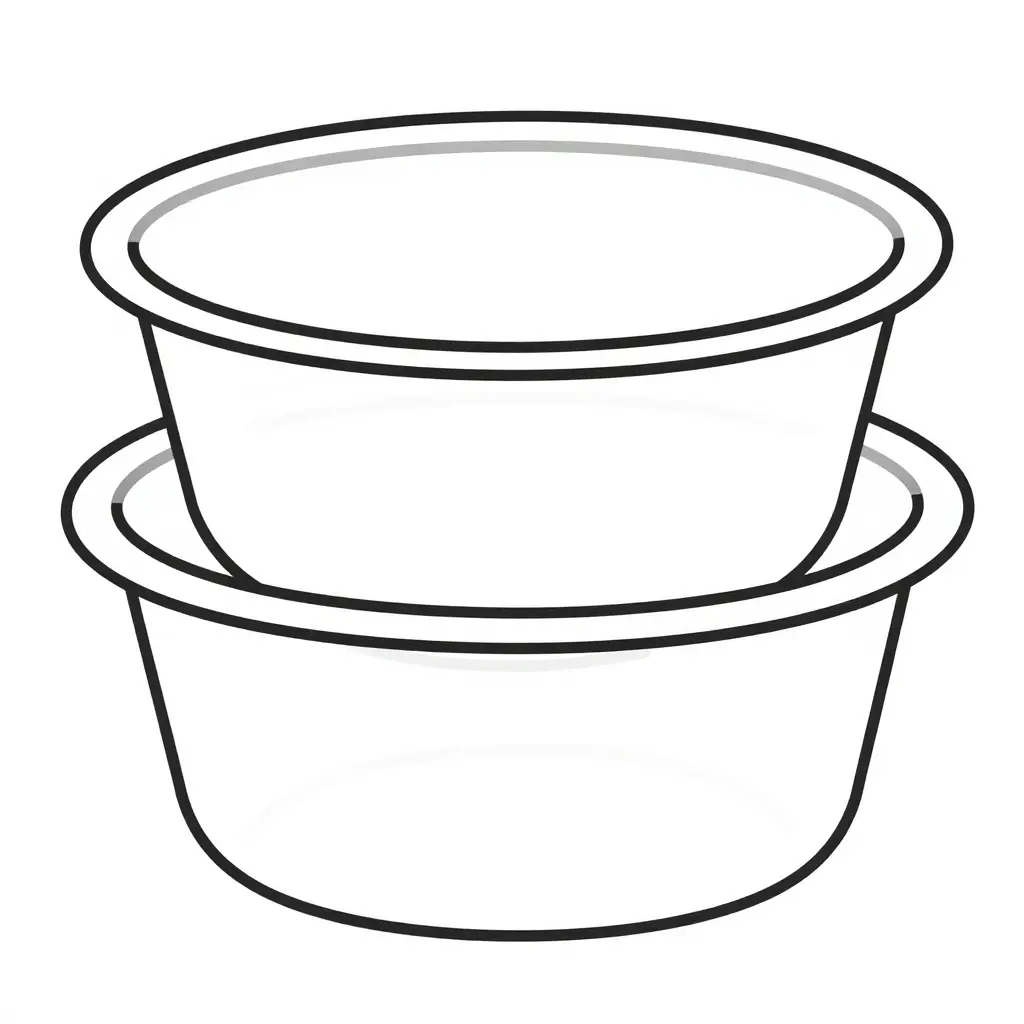
Minimalist 2D cross-section of two nested round plastic food containers: the upper tub rim contacts the lower tub rim at the seating point, the sidewall taper angle sits between the two walls, and a trapped-air pocket forms near the bottom of the nest.
Reading the Diagram
- Rim-to-rim contact point – the upper tub’s rim seats directly on the lower tub’s rim. This is the first place two parts touch, and it is where axial load transfers from the top of the stack into the tub below.
- Taper angle – the small angle between the two sidewalls. A shallow taper lets the walls converge faster, so contact migrates down the wall. A steeper, well-controlled taper keeps clearance until the rims meet.
- Trapped-air pocket – the sealed void between the two bottoms. As the upper tub descends, air is squeezed into this pocket. If it cannot escape fast enough, pressure builds and can hold the tubs apart or snap them together hard enough to wedge.
Why Jamming Starts at the Rim
Jamming is not a bottom-out problem; it is a rim problem. The rim is the stiffest, least compliant part of the tub, so once the upper rim bites into the lower rim, friction climbs sharply with every extra millimeter of drop. Under the vibration and stacking pressure of a filling line, that grip locks in. The taper angle sets how quickly the walls approach each other, and the trapped-air pocket sets how hard the upper tub is pushed down in the first place. Get both right and tubs seat, hold, and release predictably; get either wrong and the line spends its shift prying them apart. To see how these angles are formed on the tooling side, review the plastic food container manufacturing process.
Other variables add to the problem once tubs reach an automated filling line:
- Inconsistent taper between production lots means nested tubs from different molding runs bite into one another instead of sliding apart cleanly.
- An oversized rim flange increases the contact area, so the rim catches on guide rails and denesting fingers as it travels down the magazine.
- High stacking pressure compresses nested tubs together, generating friction that effectively welds one rim to the next.
- Moisture or residual mold lubricant leaves a tacky film that glues the rim of one container to the container stacked above it.
- Temperature-driven shrinkage after cooling can narrow the taper, tightening the fit between stacked tubs and slowing their release.
- Recycled regrind blended into the resin alters wall stiffness, so some containers flex and grip at the rim instead of dropping free. This behavior often comes down to how the plastic food container manufacturing process balances resin consistency and cooling.
- Denesting vacuum pulls nested tubs too tightly, especially when trapped air cannot escape between the tapered walls.
- Off-specification tooling wear compounds all of the above by drifting the effective taper further out of tolerance over time.
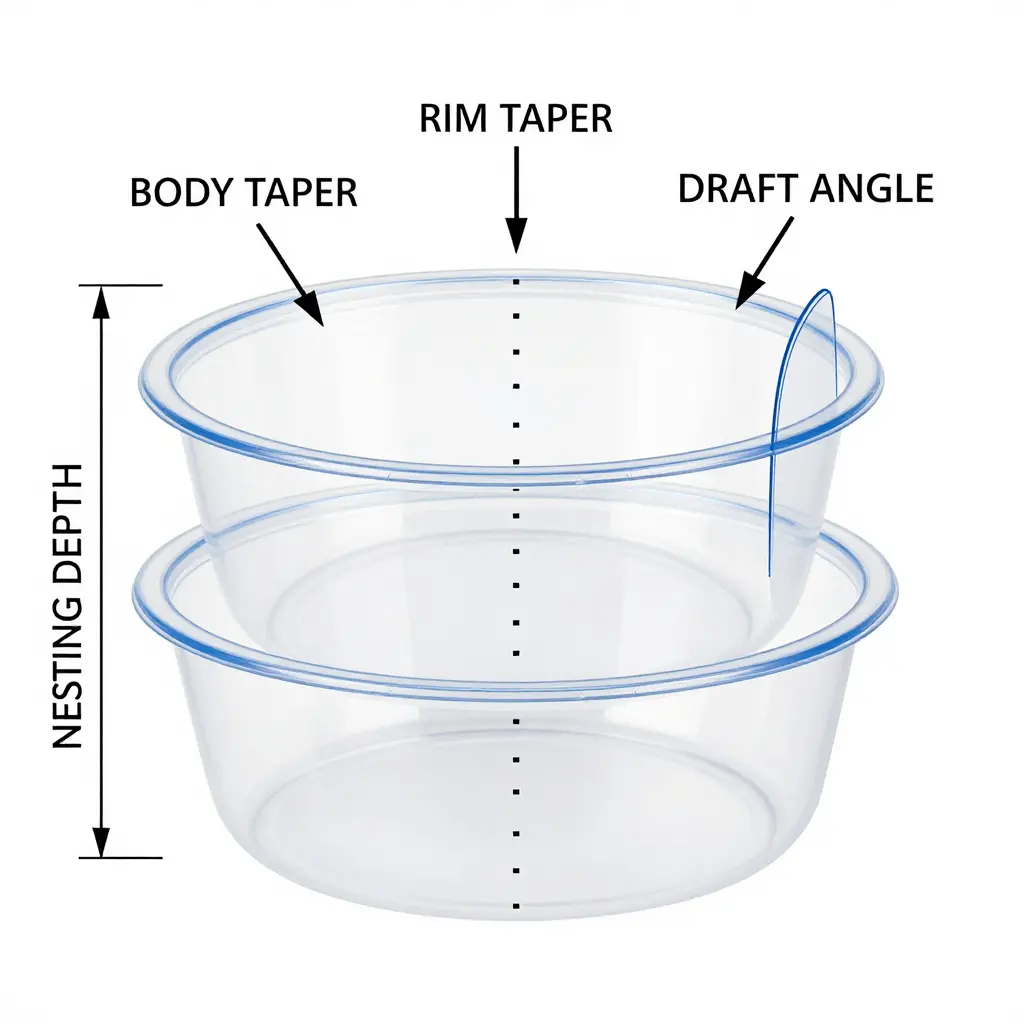
Body Taper, Rim Taper, and Draft Angle: Three Angles, Three Jobs
Three angles decide whether your round plastic food containers glide onto the filling line or stop it cold, and mixing them up is the fastest way to order a tub that jams.
Body taper is the sidewall slope measured from vertical across the main height of the tub. It sets how far one tub sinks into the one below, so it is the master number for nesting depth.
Rim taper is the angle at the very top lip, where the rim of one tub touches the rim beneath it. This is the contact zone that decides whether nested tubs slide apart freely or lock together.
Draft angle is the molding slope that lets the part release from the tool. Every vertical surface needs it, and it works alongside body taper rather than replacing it. All three are cut into the tool itself, so they are fixed during plastic food container manufacturing rather than at the line.
How Each Measurement Changes Your Line
| Measurement | What it controls | Too little | Too much |
|---|---|---|---|
| Body taper | Nesting depth, denesting force | Tubs jam and stick | Loose stacks, fewer tubs per pack |
| Rim taper | Rim interference at the lip | Rims grab and lock on the filling line | Weak rim grip and poor seal |
| Draft angle | Mold release from the tool | Scuffing and ejection faults | Thin walls and weak parts |
Why Two “Identical” Tubs Behave Differently
Two tubs of the same nominal size can behave completely differently because taper depends on the reference point. Measure from the outer base to the outer rim across the full height and you get one number. Measure only the upper band, or from the inner wall, and you get another. A supplier’s stated “3° taper” may not be your 3°. Confirm the measurement points before comparing quotes, or you will sign off on a tub that never matches the sample.
A Workable Taper Range and Its Trade-offs
For most round tubs, a body taper between 3° and 5° is the practical working range, and the 4°-5° band is where jams drop off hardest. Below roughly 2°, tubs jam and rim interference spikes. Above 5° to 6°, nested tubs wobble and stacks lose stability. The chart below shows why the middle wins.
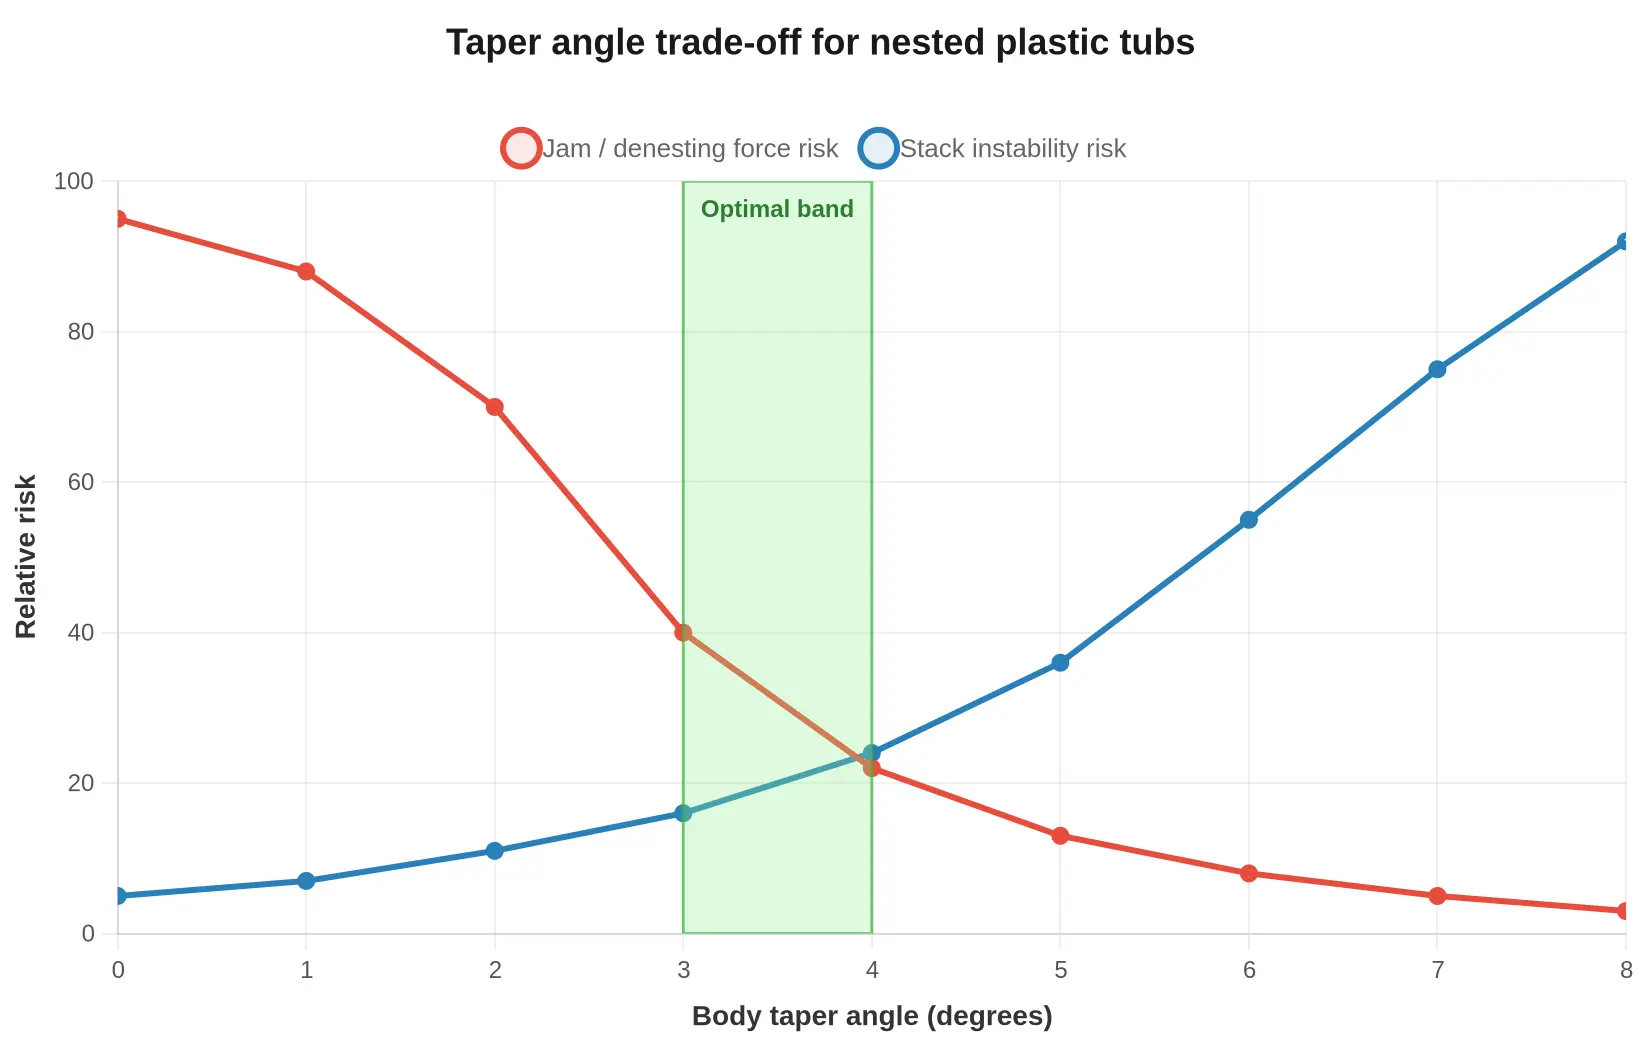
Lock the range, confirm the reference point, and put it on the drawing. That one line prevents most rim jams before the first pallet ships.
Taper Specifications for Round Plastic Food Containers
Use this spec sheet as your procurement checklist. Lock every value below into the drawing and the purchase order before tooling is cut, because these are the tolerances that decide whether nested tubs glide onto the filling line or weld themselves together at the rim. Taper is set by the mold, so fixing it later means a full tool rebuild; getting the numbers right up front is far cheaper than sorting jams on the floor.
| Parameter | Recommended Range | Common Failure Value | Effect on Denesting |
|---|---|---|---|
| Body taper | 3-5 degrees per side | Below 2 degrees | Insufficient taper increases body-to-body interference; nested tubs bind and refuse to release |
| Rim taper | 2-4 degrees | Below 1 degree or negative | Flattened rim angle lets adjacent rims lock; the stack jams at the magazine throat |
| Rim flange thickness | 0.4-0.7 mm | Below 0.3 mm or above 0.9 mm | Thin flanges flex and catch on guides; thick flanges cut clearance and inflate stack height |
| Wall thickness | 0.5-0.8 mm | Below 0.4 mm | Walls flex inward under load, raising friction between nested bodies and stalling gravity feed |
| Nesting depth | 15-25 mm engagement | Above 30 mm | Deep nesting traps air and creates a vacuum seal, spiking the force needed to denest |
| Rim diameter tolerance | +/- 0.3 mm | Above +/- 0.5 mm | Oversize rims collide, undersize rims tilt sideways and jam the denesting rails |
How to use this table
- Treat the recommended range as your buying window and the failure value as a reject trigger at incoming inspection.
- Chase taper and rim tolerance first; they drive most rim-area jams on automated lines.
- Pair tight rim tolerances with a verified denesting force test on a sample stack before you release the PO.
Measuring and Verifying Taper Before You Order
Before committing a purchase order for round plastic food containers, packaging engineers should verify taper directly rather than trusting a supplier’s catalog drawing. Taper is the slight draft angle built into the container wall so parts release cleanly from the mold, and it is what lets tubs nest tightly for shipping yet still separate smoothly on an automated filling line. Get it wrong and you either ship excess air or fight constant denesting jams at the rim. For a deeper look at how these dimensions are set at the press, see this overview of the plastic food container manufacturing process.
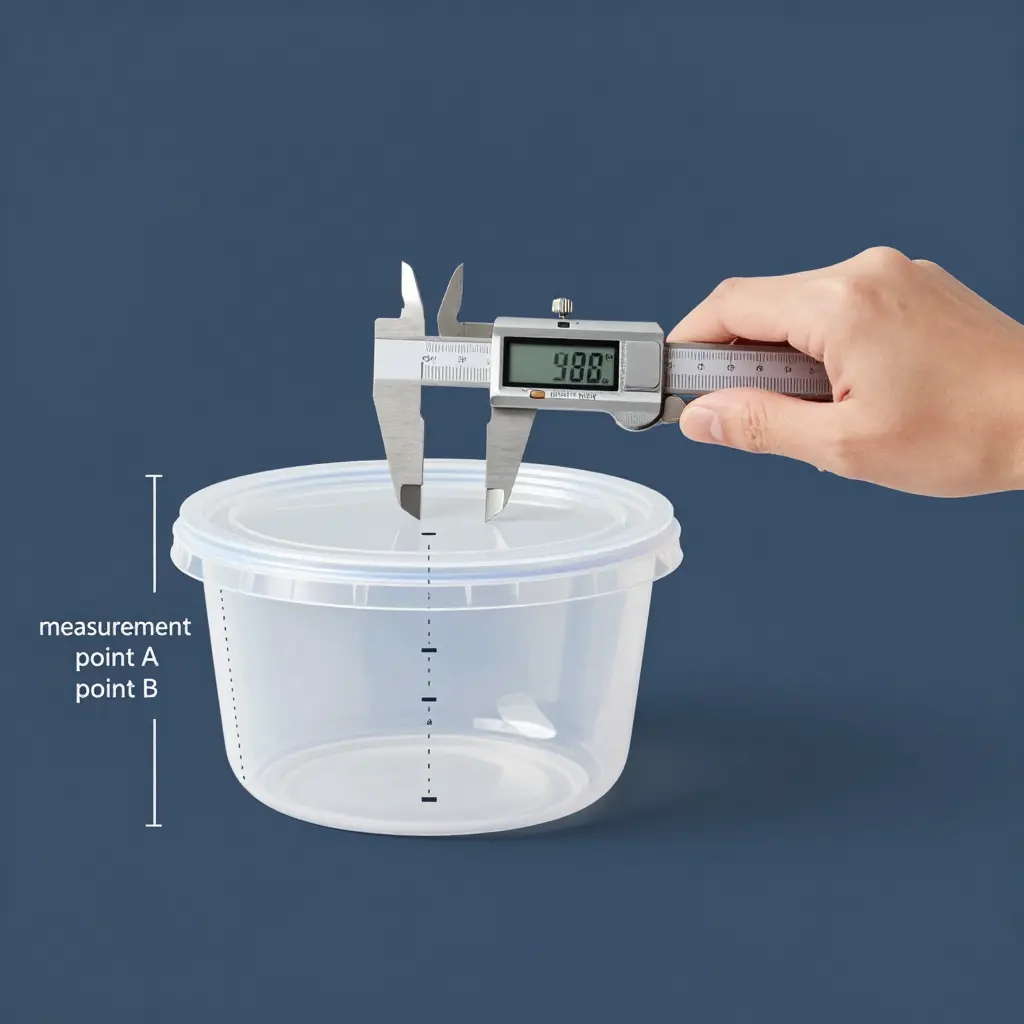
Start with the body. Using calibrated digital calipers, measure the outside diameter at two defined height points – typically 10 mm above the base and 10 mm below the rim – on at least five tubs drawn from different mold cavities. Subtract the lower reading from the upper reading, divide by the vertical distance between the two points to get the taper per unit height, then convert that value into a draft angle. Consistency across samples matters as much as the absolute number; wide variation usually signals a worn or misaligned mold.
Next, check rim taper. Measure the rim’s outer diameter at its top edge and again just beneath the rolled lip. That delta tells you how aggressively the rims will grip one another when tubs are stacked, which is where most line stoppages begin. Then run a stacking and denesting test: nest ten tubs, let them settle under a standard load for an hour, and separate them with a push gauge or spring scale attached to the top tub, recording the peak release force for each pair. An acceptable release force generally falls between 5 and 15 N (roughly 1 to 3.5 lbf). Below that, tubs may topple during transport; above it, operators and denesting cups struggle to separate them.
Finally, request sample tubs from the actual production mold and run them on the real filling line before locking specifications. Log every result so the data follows the part: part number, mold cavity, body taper angle, rim measurement, release force, sample size, and date.
| Part No. | Cavity | Body Taper Angle | Rim Delta | Release Force (N) | Sample Size | Date |
|---|---|---|---|---|---|---|
| TUB-16R | 1 | 2.1 deg | 0.8 mm | 9.4 | 5 | 2026-10-01 |
| TUB-16R | 2 | 2.3 deg | 0.9 mm | 11.2 | 5 | 2026-10-01 |
| TUB-16R | 3 | 1.7 deg | 0.5 mm | 6.1 | 5 | 2026-10-01 |
A quick pass/fail rule keeps the decision simple: accept the run only when every cavity lands inside the agreed taper window and its release force stays within 5 to 15 N. Anything outside that band is a signal to revisit the mold, not the filling schedule. The log above shows why the force check alone is not enough. All three cavities released between 5 and 15 N, yet their measured taper – 1.7° to 2.3° – sits below the 3° floor, which is exactly the condition that produces rim jams at line speed.
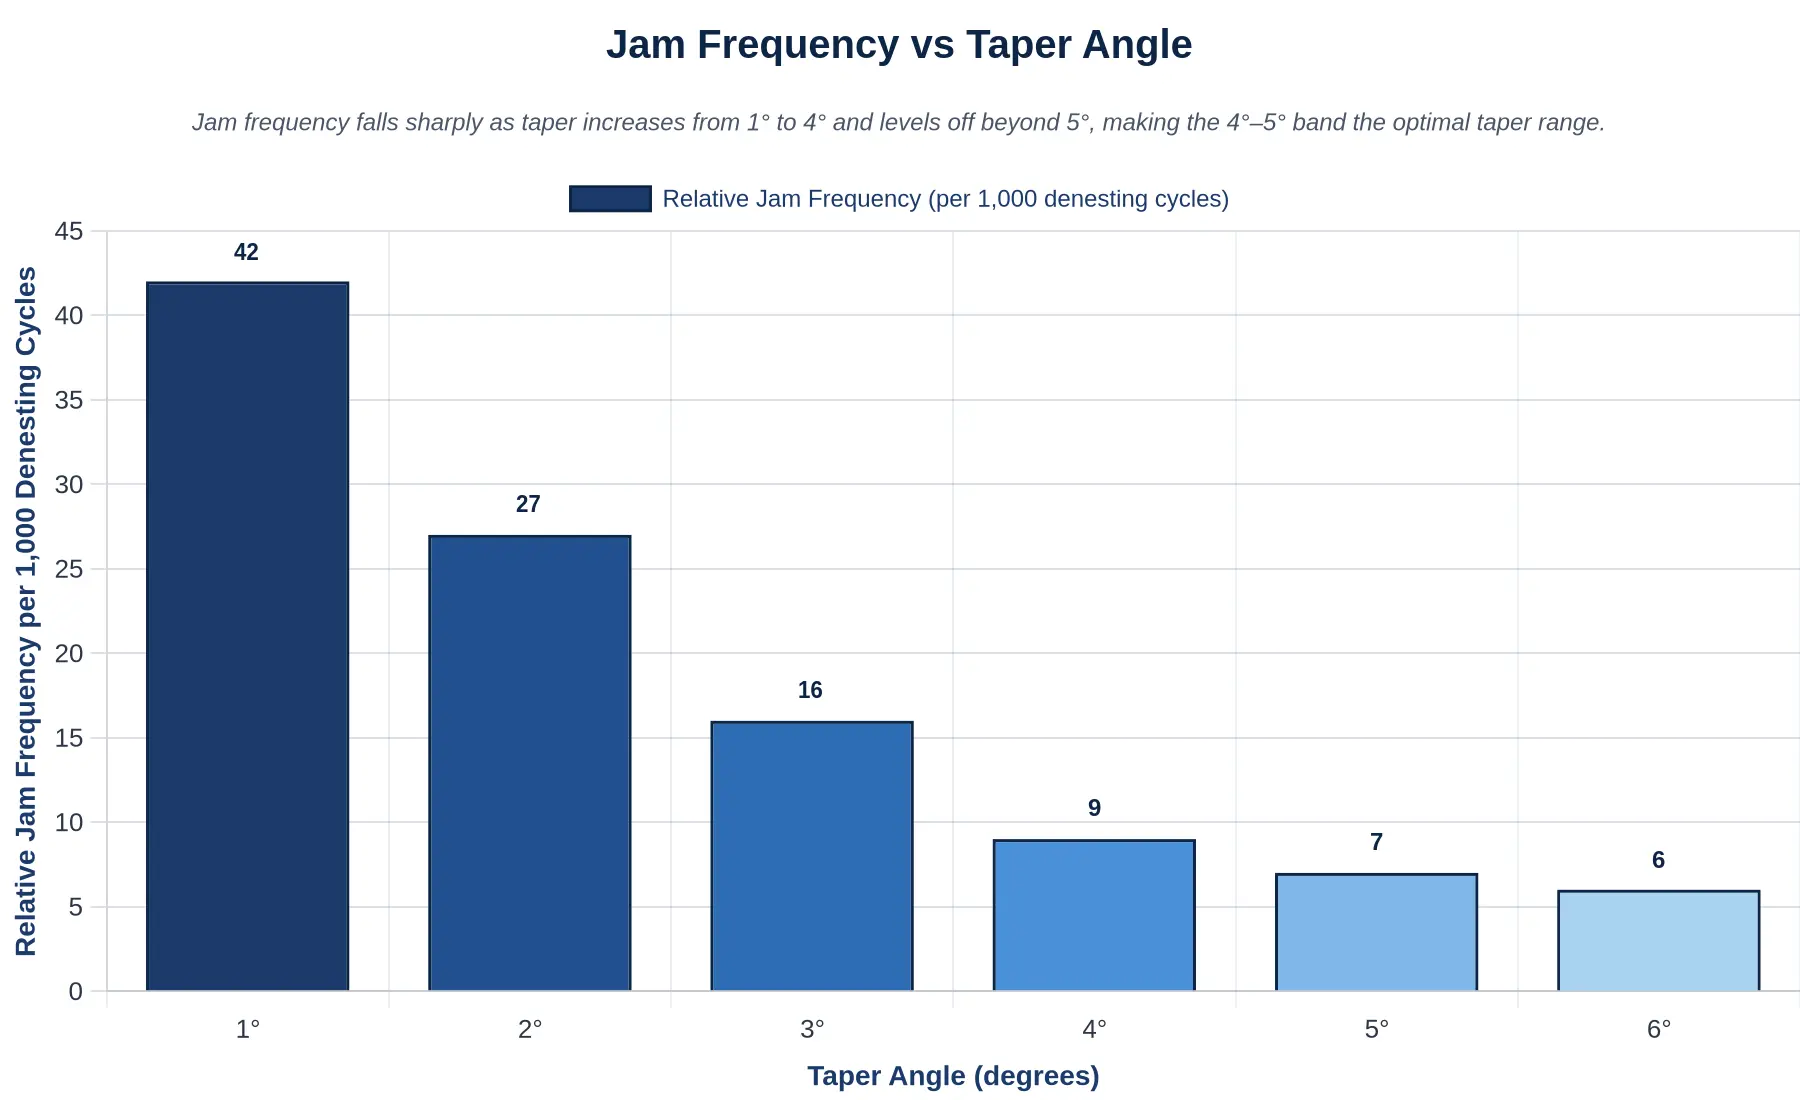
Figure: Jam Frequency vs Taper Angle. The chart plots relative jam frequency (per 1,000 denesting cycles) against taper angle for round plastic food containers. At a shallow 1° taper, nests jam roughly 42 times per 1,000 cycles; the figure drops to 27 at 2°, 16 at 3°, and 9 at 4°, then flattens at 5° (7) and 6° (6).
Jam frequency falls sharply from 1° to 4° and levels off beyond 5°, which makes the 4°-5° band the best working range for reliable denesting.
| Taper Angle | Relative Jam Frequency (per 1,000 denesting cycles) |
|---|---|
| 1° | 42 |
| 2° | 27 |
| 3° | 16 |
| 4° | 9 |
| 5° | 7 |
| 6° | 6 |
Widening the taper from 1° to 4° removes about 79% of rim jams, while pushing past 5° buys almost nothing. Over-steepening the wall also costs usable internal volume and can make the container feel sloppy in secondary handling, so the payoff sits at 4°-5°. When you specify containers for an automated filling line, ask your supplier for the actual taper angle and the wall-thickness tolerance at the rim; these two variables, not the container diameter, drive most denesting failures. To understand how these dimensions are controlled during production, see the guide to the plastic food container manufacturing process.
Buyer’s Pre-Order Checklist: Round Plastic Food Containers for Automated Filling Lines
Specifying round plastic food containers for an automated line is a locking-in decision: once the tooling is cut, you live with that taper, that rim, and that denesting behavior for the entire production run. Use this checklist to protect your filling line before you sign the purchase order.
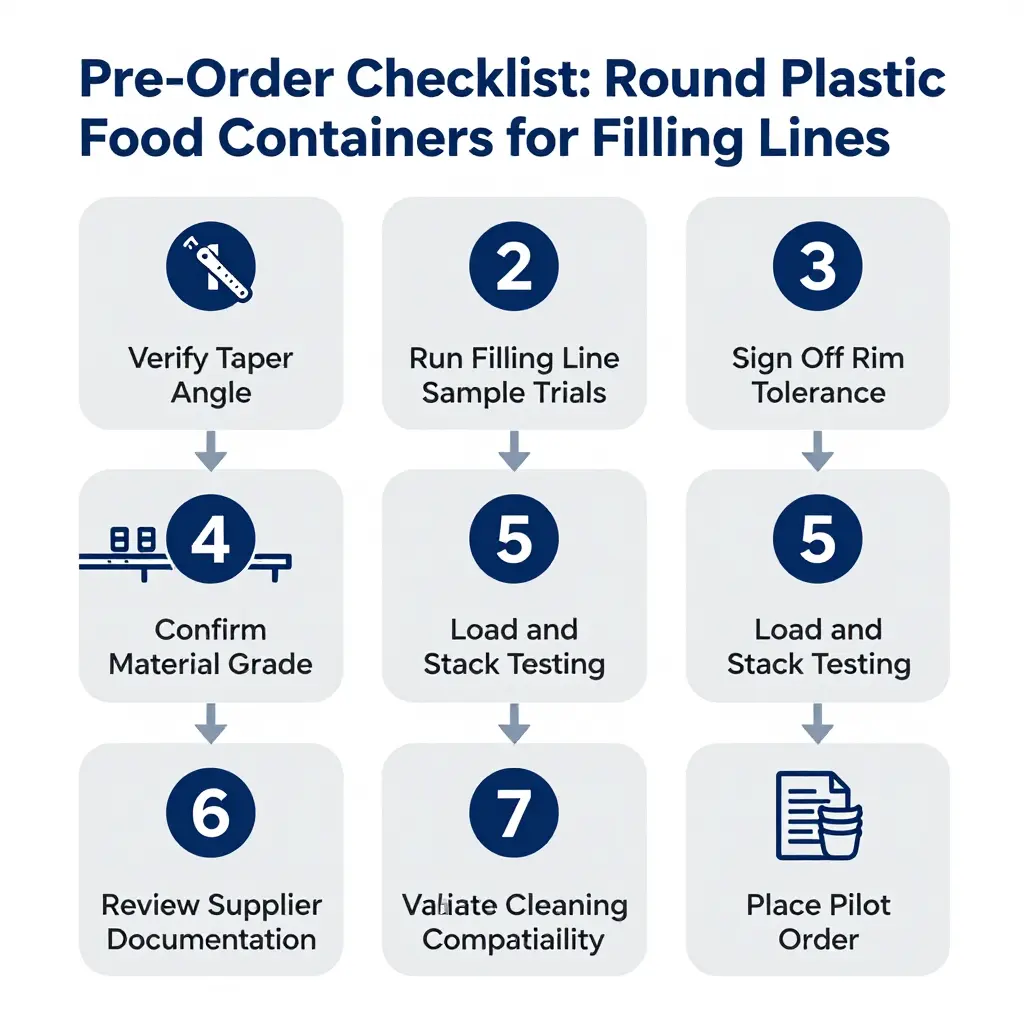
- Verify the taper angle first. The internal wall angle controls how tubs nest, grip, and release. Too shallow and they bind; too steep and they waste cube. Confirm the taper with a physical gauge, not a drawing, then compare it to your target jam rate. Understanding how the wall geometry is formed on the tool helps you ask the right questions, so read this breakdown of the plastic food container manufacturing process before you approve dimensions.
- Run sample line trials. Never buy on spec sheets alone. Load a full pallet of samples onto your actual filler and measure denesting force, jam frequency, and cups-per-minute drop-off across at least three shifts.
- Sign off on rim tolerance. The rim is where jams are born. Agree on a maximum rim diameter variance and demand it in writing; a rim that drifts by even a fraction can catch on the escapement and stall the line.
- Confirm the material grade. Check the resin grade, wall thickness, and thermal limits against the fill temperature and any staining risk from sauces or spices. Containers built for color retention hold up better over repeated runs, which is why many buyers screen options using these stain-resistant plastic food storage container selection criteria.
- Run load and stack testing. Fill to the maximum declared volume, then stack to your real pallet height and hold for 48 hours to confirm no ovalizing, cracking, or lid pop-off.
- Collect supplier documentation. Request declarations of compliance, food-contact certificates, migration test reports, and lot traceability for the resin.
- Validate cleaning compatibility. Confirm your wash temperature and cleaning agents will not warp the taper or cloud the walls, and align on safe handling practices covered in this clean plastic food containers guide.
- Lock the spec and place a pilot order. Freeze taper, rim, material, and packaging in one signed specification sheet, then run a pilot batch before committing to full volume.
Work through these steps in order and you replace a jam-prone guess with a verified specification.
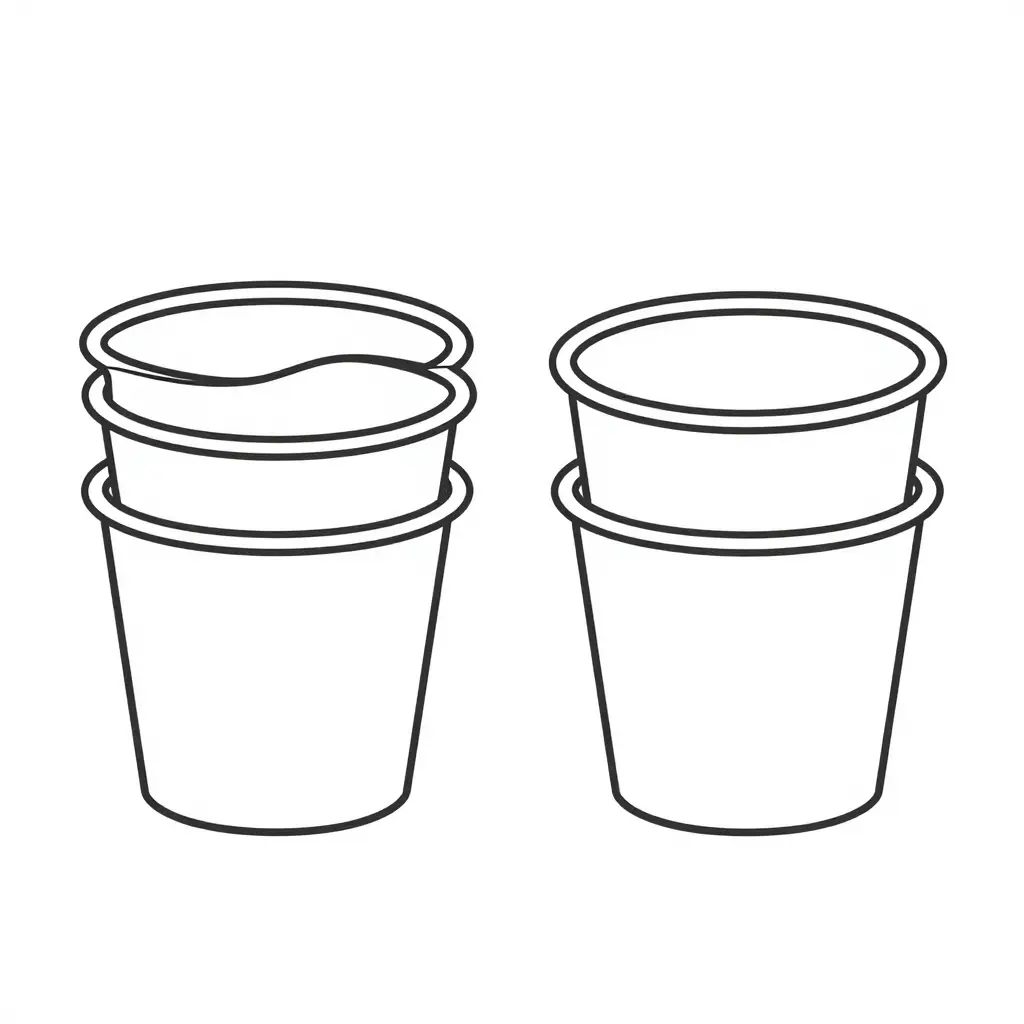
The comparison above shows the geometry problem at the center of rim jamming. On the left, an insufficient taper angle leaves the nested rims nearly parallel, so they collide and wedge tightly together. On the right, an optimal taper angle opens a clear gap between rims, letting each tub denest smoothly on the filling line.
Specifying round plastic food containers for an automated filling line comes down to geometry. Below are the questions packaging engineers ask most, with plain answers on nested tubs, taper, and rim jamming.
Why do nested tubs jam at the rim on filling lines?
Stacked tubs separate through tiny air gaps between their walls. When the taper is too shallow, the upper rim grips the tub below and the denester stalls. Consistent wall geometry stops the jam at the rim.
What taper angle is recommended?
Taper drives release force during denesting. Most round plastic food containers run best with a 3-5 degree body taper, and anything under 2 degrees makes nested tubs hold suction. Lock a 4 degree taper as your baseline.
How do you test taper before ordering?
You can measure taper without a production run. Cut a tub vertically, lay it flat, and read the wall angle with a digital protractor across several units. Confirm the average taper, then verify with a denest test. See how taper is set during the plastic food container manufacturing process.
Do material and wall thickness matter?
Yes. Resin stiffness and wall thickness change how nested tubs behave. Thinner polypropylene walls flex inward, raising rim friction, while uneven thickness shifts the taper. Specify resin and a wall tolerance that protects geometry, not just the angle.
Are sample line trials worth the time?
Trials expose real variables cheaply. Humidity, fill temperature, and denester speed all shift how round plastic food containers release, so a short run reveals jams early. Always run a sample trial before committing to a full order.